Showing posts with label inspirational. Show all posts

Tuesday, June 20, 2017

How to: Love is for Everyone and Giveaway Winner!


Stencil Girl recently released seven new designs of mine! In recent posts, I've been showing you how I used them. 

Today, I'm sharing a tutorial with the Love is for Everyone Script.

I designed this, and the See the Divine, stencil so that you could mix and match the words to make different phrases, besides the obvious, such as:

Love is Divine
Love is meant to lift us up
lift up out of the darkness
see Love in the darkness
I am in Love 
Love is everything
lift up the Divine in everything
Love everyone and everything
lift everyone up in Love
everything is Divine
I am Divine
I see the Divine

You get the idea! I am sure there are many more!

Of course, you can also use each stencil on its own, like this:


In addition to the Love is Everything stencil, I used my Build a Cosmos stamps from Rubbermoon.  You can see them all here.  


AND only one week late... here is the winner of the summer blog hop!!! It is 

cjsrq, who commented on all of our blogs, and said: Thanks for all you are doing to make America kind (and rational) again.   I am reaching out to you for your snail mail address to send you your Women Heal the World stencil!


         Visit Stencil Girl Products and RubberMoon Stamps to see all my designs!

If you haven't already - please connect with me here:
Your comments make me so happy and let me know you were here. I read and treasure every comment and will happily answer any questions as soon as I can.

Tuesday, June 13, 2017

DIY Renew Note Card with Karen Gaunt - Creative Team Thursday (on Tuesday)


Is it just me or can you never find a little card or note in the house when you really need one? I'm not even talking about a birthday card, just a plain little one that you want to send just because?

Well that's where the idea for this little project came from. I used kraft cardstock and a matching envelope to create this notecard that can be used for any occasion that might come up!


I worked with the dots and dashes stencil from stencilgirl and the renew rubber stamp from rubbermoon both designed by Jessica. I kept it very simple so these could easily be made several times in a set. Perfect to keep on hand or even to give away.


I hope that you enjoy the video!


Thanks,
Karen


Karen Gaunt is a mixed media artist with a passion for color and a soft spot for paint. She works in a regular job full time and daydreams all day about the moment she can let loose in her journals in the evening. She's a mother as well and loves nothing more than creating with her daughter in their matching art journals. Karen believes that making Art is for everyone and loves to encourage and inspire others to make. She enjoys trying new techniques and colors and believes that there is no such thing as too many art journals.  Visit her at her blog and on Instagram.


         Visit Stencil Girl Products and RubberMoon Stamps to see all my designs!


If you haven't already - please connect with me here:
Your comments make me so happy and let me know you were here. I read and treasure every comment and will happily answer any questions as soon as I can.

If you are entering a GIVEAWAY, please add your email address in the event I need to contact you.

To avoid SPAM, please write it like this: jessicasporndesigns (at) gmail (dot) com

Thank You!

Thursday, March 23, 2017

How to Create a Fold-out Card - Creative Team Thursday with Marit Barentsen


In the USA as well as in Europe times are challenging and it sometimes feels as if the world grows darker... therefor I felt the need to create a colorful and happy little booklet. Creating it made me smile and I hope this tutorial will bring a smile to your face too. Enjoy!

Cut a wide sheet of paper into a strip and fold the pages (see photo.) The booklet in this tutorial is 23.25 inch wide, but if you don't have paper that size, you can adjust the sizes or go for less pages)


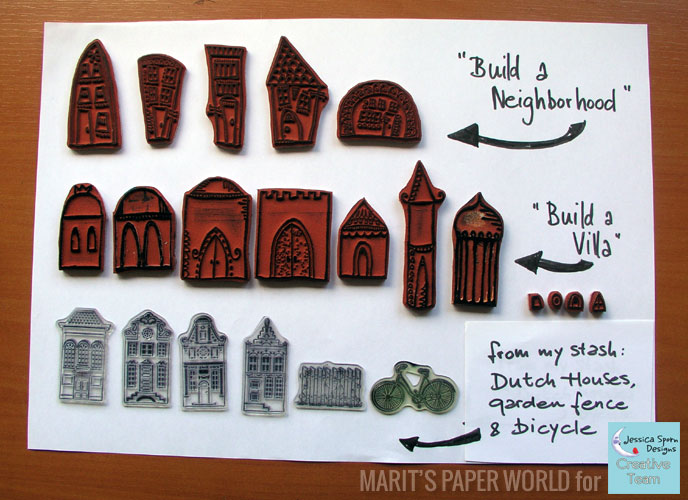
Collect all the houses-stamps that you have to stamp a neighborhood - the more different the images are, the better. You want to build a "multi-cultural neighborhood."


Mix and match; stamp all the houses, domes, fences, street lights, trees and cars in a strip at the bottom of the booklet. Stamp on both sizes of the booklet.


Use masking sheet to trace your 'neighborhood' and cut it out. Cover the stamped images with this mask.


Next step is to create a colorful 'sky'. I wanted the sky to go from dark (nighttime) to light (bright blue - daytime) and used different colors of spray ink to create the effect. Wet your paper first so that the ink will nicely blend into each other. Give the sky some extra interest by spraying through a stencil ('Circles and Squares.')


Spray both sizes of the booklet. Let one side dry before you start working on the other side - if you are impatient you can use a heat gun to speed the process.)


Remove the mask after spraying. There may be white gabs between the houses, that you can fill in with the right color ink and a small brush.

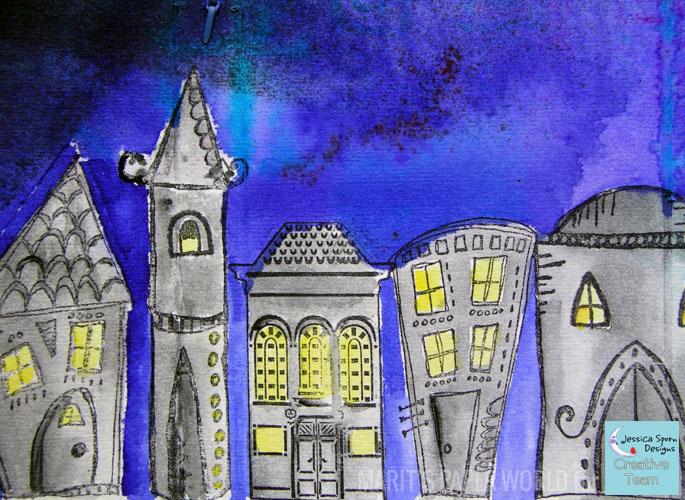
Next, color the stamped images. I used watersoluble crayons and a water brush to create a watercolor effect but you can also color the images with coloured pencils, copic markers etc.

To strengthen the effect of nighttime, I colored the houses that were in the dark "nighttime" area grey. The yellow windows show the lights are on in the houses...


...and I used all kinds of colors to create a fun, bright new neighborhood.


Now, fold the booklet and close it so you can see how the front and back looks like... (You may want to mark the front and back of the booklet before you start writing a quote on the pages. You don't want part of the lettering accidently show on the cover!)

Next, I found two quotes that I hand lettered on the back and front of the booklet. Write the quote with a soft pencil first to see if it fits. On this inside of the booklet the quote covers all pages, from left to right.


On the 'outside' of the booklet, leave the pages that will show when the booklet is closed as they are - no lettering there. The quote I used is from a famous Dutch song and says "Everyone belongs to the world and the world belongs to everyone."


Find a nice, fitting piece of ribbon that will close your booklet. Attach the ribbon to the spine of the book with a cotter pin. As you can see, I also glued a scalloped edge at one side of the booklet (remember those edges from that scrapbooking line?) This edge adds to the whimsical look of the booklet when it's closed.


You can show off this booklet by displaying it on a side table or cabinet if you like.


It also makes a lovely and personal (birthday) present.


I hope you enjoyed my tutorial. Now go enjoy this diverse world we live in. Be nice to each other!

~~~~~~~~~~~~~~~~~~~~~~~~~~~~~~~~~~~~~~~~~~~~~~~~~~~~~~~~~~~~~~~~~~~~~~

SUPPLIES USED:

Stamps from the series 'Build a Neighborhood'
·         Artsy Apartment
·         Humble Highrise
·         Creative Condo
·         Perfect Place
·         Creative Condo

Stamps from the series 'Build a Villa'
·         Crown Top Dome
·         Artsy Arches
·         Doodle Dome
·         Castle Casa
·         Bohemian Hut
·         Whimsy Turret
·         Fonion Dome

Stencils:
·         Circles& Squares

Other:
·         Strip of thick paper
·         Some extra stamps (from my stash)
·         Black stamping ink
·         Masking sheet
·         Dylusions spray ink
·         Water-soluble crayons
·         White and black marker
·         Piece of ribbon

·         Cotter pin


Marit Barentsen is a passionate art journaler, mixed media artist, art instructor and creative writer from the Netherlands. Marit inherited a passion for words from her mother, who is a writer. Her father taught her to not only “look “ but also “see.”  That combination led Marit to become an art teacher and her art always showed images and words. After art school, she worked as a graphic designer. Years later, she re-discovered the  combination of words and images in art journaling and her art took flight.  Marit's art has been published in various magazines and art books. 


Find Marit on her websiteFacebook page, and  blog.

________________________________________________________________________________


THANK YOU MARIT for an awesome post! 


         Visit Stencil Girl Products and RubberMoon Stamps to see all my designs!


If you haven't already - please connect with me here:
Your comments make me so happy and let me know you were here. I read and treasure every comment and will happily answer any questions as soon as I can.

If you are entering a GIVEAWAY, please add your email address in the event I need to contact you.

To avoid SPAM, please write it like this: jessicasporndesigns (at) gmail (dot) com

Thank You!

Thursday, March 2, 2017

Create an Abstract Art Journal - Creative Team with Kristin Van Valkenburgh


"What goes on in abstract art is the proclaiming of aesthetic principles ... It is in our own time that we have become aware of pure aesthetic considerations. Art never can be imitation. • - Hans Hofmann

It’s Creative Team Thursday!  I hope this finds you happy & well!

I've been on a bi t of an abstract kick lately: the idea of working with form and color, without the necessity of a focal image or specific message, has freed me in a way I haven't felt in quite a while ...


It began with a trip I recently took where (unlike my usual schlep of a hundred supplies), I limited myself to just a few pens and washi rolls, one fabulous stencil, a small bottle of gesso and a tin of watercolor paints. My only other companion was an old art journal that I dug out of the bowls of my studio for the purpose.

Although I didn't start out with the idea of "Abstract Art Journaling," as I allowed myself to just play with pools of color and shimmer, I found myself feeling really inspired. Thing is, like most of us, my head is constantly swimming with artsy projects, plans, and ideas. And when I sit to create, I dig into one of those projects, plans or ideas and go with that - instead of just having fun anymore. But that all changed when I rediscovered the joy of letting go and just being with my journal. Splashes of bright color, tiny pieces of tape, and little bits of stamps and stenciling became bigger and more important that they would have before. And the color white became the central focus, highlighted by small moments of happy around it.

Here's a quick video on YouTube so you can see how I created these art journal pages.


For more from Jessica Sporn: http://sporndesigns.com
For your own ·Dots and Dashes Stencil: http://www.stencilgirlproducts.com/product-p/1091.htm
For your own ·Build·A·Villa Window Cube Stamp: http://www.stencilgirlproducts.com/product-p/1091.htm
For more of my videos: https://www.youtube.com/chanoe11uc1osBwGToZKc3nnfI69Pzfg
Royalty Free Music: http://www.epidemicsound.com


A childhood obsession with Hollywood starlets led to an early life in the theater, where Kristin Van Valkenburgh spent many happy days on set and behind the scenes as both an actress and makeup artist for the stage. Kristin has a passion for all things mixed media and loves to create whimsical pieces with lots of layers, bright, poppy colors, big eyes and positive affirmations. Her work has been featured in numerous Stampington publications including Somerset Studio, SomersetStudio Gallery, Somerset Life, Somerset Apprentice, Artists’ Cafe and Art Journaling.  

You can find Kristin on her blogYouTube, Facebook and Instagram.

THANK YOU KRISTIN!  To see all of the Creative Team posts, click here!


         Visit Stencil Girl Products and RubberMoon Stamps to see all my designs!


If you haven't already - please connect with me here:
Your comments make me so happy and let me know you were here. I read and treasure every comment and will happily answer any questions as soon as I can.

If you are entering a GIVEAWAY, please add your email address in the event I need to contact you.

To avoid SPAM, please write it like this: jessicasporndesigns (at) gmail (dot) com

Thank You!