

In the USA as well as in Europe times are
challenging and it sometimes feels as if the world grows darker... therefor I
felt the need to create a colorful and happy little booklet. Creating it made
me smile and I hope this tutorial will bring a smile to your face too. Enjoy!
Cut a wide sheet of paper into a strip and
fold the pages (see photo.) The booklet in this tutorial is 23.25 inch wide,
but if you don't have paper that size, you can adjust the sizes or go for less
pages)

Collect all the houses-stamps that you have to
stamp a neighborhood - the more different the images are, the better. You want
to build a "multi-cultural neighborhood."

Mix and match; stamp all the houses, domes,
fences, street lights, trees and cars in a strip at the bottom of the booklet.
Stamp on both sizes of the booklet.

Use masking sheet to trace your 'neighborhood'
and cut it out. Cover the stamped images with this mask.

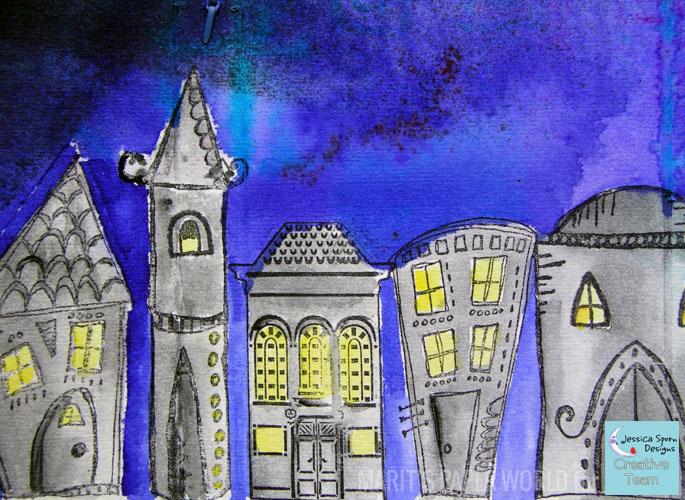
Next step is to create a colorful 'sky'. I
wanted the sky to go from dark (nighttime) to light (bright blue - daytime) and
used different colors of spray ink to create the effect. Wet your paper first
so that the ink will nicely blend into each other. Give the sky some extra
interest by spraying through a stencil ('Circles and Squares.')

Spray both sizes of the booklet. Let one side
dry before you start working on the other side - if you are impatient you can
use a heat gun to speed the process.)

Remove the mask after spraying. There may be
white gabs between the houses, that you can fill in with the right color ink
and a small brush.
Next, color the stamped images. I used watersoluble
crayons and a water brush to create a watercolor effect but you can also color
the images with coloured pencils, copic markers etc.
To strengthen the effect of nighttime, I
colored the houses that were in the dark "nighttime" area grey. The
yellow windows show the lights are on in the houses...
...and I used all kinds of colors to create a
fun, bright new neighborhood.

Now, fold the booklet and close it so you can
see how the front and back looks like... (You may want to mark the front and
back of the booklet before you start writing a quote on the pages. You don't
want part of the lettering accidently show on the cover!)
Next, I found two quotes that I hand lettered
on the back and front of the booklet. Write the quote with a soft pencil first
to see if it fits. On this inside of the booklet the quote covers all pages,
from left to right.

On the 'outside' of the booklet, leave the
pages that will show when the booklet is closed as they are - no lettering
there. The quote I used is from a famous Dutch song and says "Everyone
belongs to the world and the world belongs to everyone."

Find a nice, fitting piece of ribbon that will
close your booklet. Attach the ribbon to the spine of the book with a cotter
pin. As you can see, I also glued a scalloped edge at one side of the booklet
(remember those edges from that scrapbooking line?) This edge adds to the
whimsical look of the booklet when it's closed.

You can show off this booklet by displaying it
on a side table or cabinet if you like.

It also makes a lovely and personal (birthday)
present.

I hope you enjoyed my tutorial. Now go enjoy
this diverse world we live in. Be nice to each other!
~~~~~~~~~~~~~~~~~~~~~~~~~~~~~~~~~~~~~~~~~~~~~~~~~~~~~~~~~~~~~~~~~~~~~~
SUPPLIES USED:
Stamps from the series 'Build a Neighborhood'
Stamps from the series 'Build a Villa'
Stencils:
Other:
·
Strip of thick paper
·
Some extra stamps (from my stash)
·
Black stamping ink
·
Masking sheet
·
Dylusions spray ink
·
Water-soluble crayons
·
White and black marker
·
Piece of ribbon
·
Cotter pin
 Marit Barentsen is a passionate art journaler, mixed media artist, art instructor and creative writer from the Netherlands. Marit inherited a passion for words from her mother, who is a writer. Her father taught her to not only “look “ but also “see.” That combination led Marit to become an art teacher and her art always showed images and words. After art school, she worked as a graphic designer. Years later, she re-discovered the combination of words and images in art journaling and her art took flight. Marit's art has been published in various magazines and art books.
Find Marit on her website, Facebook page, and blog.
________________________________________________________________________________
THANK YOU MARIT for an awesome post!


Visit Stencil Girl Products and RubberMoon Stamps to see all my designs!
If you haven't already - please connect with me here:
      |
Your comments make me so happy and let me know you were here. I read and treasure every comment and will happily answer any questions as soon as I can.
If you are entering a GIVEAWAY, please add your email address in the event I need to contact you.
To avoid SPAM, please write it like this: jessicasporndesigns (at) gmail (dot) com
Thank You!
What a phenomenal and super-timely tutorial. Thank you for this uplifting, poignant work. xo
ReplyDeleteWhat a wonderful project. Your tutorial is very organized and inspiring! Thank you Marit!
ReplyDeleteWhat a fun and colorful card. That village is just so cute. I just loved it. Thank you.
ReplyDeleteMarit, what a wonderful booklet! I just love your quote and the idea of the village!
ReplyDeletethank you for sharing! xx
Thank you for all your compliments! People like you make this world worhtwile to be in!
ReplyDeleteThis is just beautiful!! xo
ReplyDelete