Showing posts with label glitter. Show all posts

Thursday, June 29, 2017

Mixed Media Layers: Tissue & Deli Paper with Kristin Van Valkenburgh


“A grownup is a child with layers on.”
— Woody Harrelson

Hey there!
I hope this finds you happy and well. I had so much fun playing with layers this time around for the Jessica Sporn Creative Team, that my fingers are still stained with ink and sticky with glitter as I write this.

Like many of us, I love, love, love adding layer upon layer to my art journaling pages or canvas pieces. The barely visible bits and pieces here and there create mystery and not only draws me in, but hopefully those who come behind me as well.

One of my favorite ways to add sheer layers is with decorative tissue and deli papers. I discovered deli paper through an artist friend of mine who not only inspired me to try it, but also sent me some of her stash so I could! Deli paper is just that - paper used to wrap deli sandwiches. It has a lovely sheen, is matte on one side, and takes wet media like a star. Likewise, tissue paper (I know I’m not the only one who hoards it at birthday parties ;) comes in so many colors, and is so see through, that it too can be so fun to play with.

Follow along as I create this layered piece using Jessica's Women Will Heal the World Stencil and Build-A-Neighborhood Stamp.  Put your own personal spin on my project and share it with us on Pinterest.  Be sure to tag it with #JSD #CreativeTeam and #KristinVanValkenburgh so we see your creation!
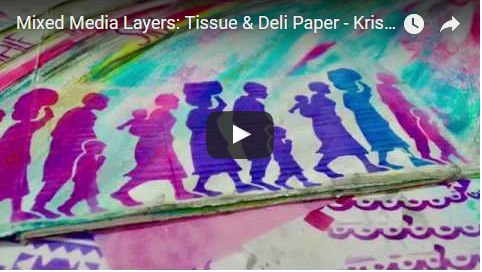
 Click to watch on YouTube


A childhood obsession with Hollywood starlets led to an early life in the theater, where Kristin Van Valkenburgh spent many happy days on set and behind the scenes as both an actress and makeup artist for the stage. Kristin has a passion for all things mixed media and loves to create whimsical pieces with lots of layers, bright, poppy colors, big eyes and positive affirmations. Her work has been featured in numerous Stampington publications including Somerset Studio, Somerset Studio Gallery, Somerset Life, Somerset Apprentice, Artists’ Cafe and Art Journaling.  


You can find Kristin on her blogYouTube, Facebook and Instagram.

THANK YOU KRISTIN!
To see all of the Creative Team posts, click here!


         Visit Stencil Girl Products and RubberMoon Stamps to see all my designs!


If you haven't already - please connect with me here:
Your comments make me so happy and let me know you were here. I read and treasure every comment and will happily answer any questions as soon as I can.

If you are entering a GIVEAWAY, please add your email address in the event I need to contact you.

To avoid SPAM, please write it like this: jessicasporndesigns (at) gmail (dot) com

Thank You!

Thursday, March 2, 2017

Create an Abstract Art Journal - Creative Team with Kristin Van Valkenburgh


"What goes on in abstract art is the proclaiming of aesthetic principles ... It is in our own time that we have become aware of pure aesthetic considerations. Art never can be imitation. • - Hans Hofmann

It’s Creative Team Thursday!  I hope this finds you happy & well!

I've been on a bi t of an abstract kick lately: the idea of working with form and color, without the necessity of a focal image or specific message, has freed me in a way I haven't felt in quite a while ...


It began with a trip I recently took where (unlike my usual schlep of a hundred supplies), I limited myself to just a few pens and washi rolls, one fabulous stencil, a small bottle of gesso and a tin of watercolor paints. My only other companion was an old art journal that I dug out of the bowls of my studio for the purpose.

Although I didn't start out with the idea of "Abstract Art Journaling," as I allowed myself to just play with pools of color and shimmer, I found myself feeling really inspired. Thing is, like most of us, my head is constantly swimming with artsy projects, plans, and ideas. And when I sit to create, I dig into one of those projects, plans or ideas and go with that - instead of just having fun anymore. But that all changed when I rediscovered the joy of letting go and just being with my journal. Splashes of bright color, tiny pieces of tape, and little bits of stamps and stenciling became bigger and more important that they would have before. And the color white became the central focus, highlighted by small moments of happy around it.

Here's a quick video on YouTube so you can see how I created these art journal pages.


For more from Jessica Sporn: http://sporndesigns.com
For your own ·Dots and Dashes Stencil: http://www.stencilgirlproducts.com/product-p/1091.htm
For your own ·Build·A·Villa Window Cube Stamp: http://www.stencilgirlproducts.com/product-p/1091.htm
For more of my videos: https://www.youtube.com/chanoe11uc1osBwGToZKc3nnfI69Pzfg
Royalty Free Music: http://www.epidemicsound.com


A childhood obsession with Hollywood starlets led to an early life in the theater, where Kristin Van Valkenburgh spent many happy days on set and behind the scenes as both an actress and makeup artist for the stage. Kristin has a passion for all things mixed media and loves to create whimsical pieces with lots of layers, bright, poppy colors, big eyes and positive affirmations. Her work has been featured in numerous Stampington publications including Somerset Studio, SomersetStudio Gallery, Somerset Life, Somerset Apprentice, Artists’ Cafe and Art Journaling.  

You can find Kristin on her blogYouTube, Facebook and Instagram.

THANK YOU KRISTIN!  To see all of the Creative Team posts, click here!


         Visit Stencil Girl Products and RubberMoon Stamps to see all my designs!


If you haven't already - please connect with me here:
Your comments make me so happy and let me know you were here. I read and treasure every comment and will happily answer any questions as soon as I can.

If you are entering a GIVEAWAY, please add your email address in the event I need to contact you.

To avoid SPAM, please write it like this: jessicasporndesigns (at) gmail (dot) com

Thank You!

Tuesday, December 13, 2016

DIY - Easy Holiday Tags and Blog Hop Winner!

Before getting underway, a few announcements!
The winners from last week's blog hop are....

Blessings Stamp:
Upcycled House Ornament:
 Decorative Wall Hanging:

Thank you to everyone who visited our blogs and left such kind and supportive words! 

Also, I wanted to remind you that these are the last days to sign up for Wanderlust at a significant discount:

Wanderlust is an online mixed media workshop experience featuring 26 amazing tutors and 50 inspirational video classes over the course of a year. The fantastic line up includes Alena Hennessy, Sandra Evertson, Mindy Lacefield and Dyan Reaveley to name only a few! Plus me, of course!

I'm writing this reminder now because Wanderlust is only available at the special offer price of £79 until 31th of December 2016 - after this date it will go up to £99 - so you might want to get shopping now while you can grab a bargain! You can sign up here.   I hope you'll join me on this exciting creative journey.

And now, here is an oldie but goodie, from 2013 - enjoy!

If you're like me, the holidays sneak up on you ad leave you scrambling for last minute gifts.  Here's a quick and easy tutorial on making some fun tags.  They can either hang from a gift, or accompany a gift card or cash!


Supplies:
Manila tags
some thin cardboard
some favorite stencils
scissors
paint
glue
a dauber or cosmetic sponge
glitter glue
string or ribbon

1.  Choose one of your stencils that has lots of open space for dabbing color.  Stencil your tags.  I used my Flowers Negative and Flowers Positive stencils, and Carolyn Dube's Use Your Words stencil from Stencil Girl Products.
2.  Choose one of your stencils that has an intricate pattern.  I used my Medallions Stencil from Stencil Girl Products.  Stencil your cardboard with white paint or gesso.  (I also used Viva Decor Silver modeling paste, but you don't have to.)
3.  I made the stars by cleaning off my more intricate stencil on black paper and then punching out the stars.  Use your imagination for this step!
4.  Cut up your cardboard into circles, squares, strips, and glue them onto your tags.
5.  Add your stars and doodle with glitter glue.
6.  Use some string, twine or ribbon to hang them.

Of course, there's a video.


And you can watch  Holiday Tags on You Tube here.


In case you missed it, here's the You Tube link to my tutorial on making some ornaments using corrugated cardboard and my Three Trees stencil from Stencil Girl.  I made a garland with them, but later separated them into individual ornaments.


What have you made for the holidays? Share your links in the comments!


         Visit Stencil Girl Products and RubberMoon Stamps to see all my designs!


If you haven't already - please connect with me here:
Your comments make me so happy and let me know you were here. I read and treasure every comment and will happily answer any questions as soon as I can.

If you are entering a GIVEAWAY, please add your email address in the event I need to contact you.

To avoid SPAM, please write it like this: jessicasporndesigns (at) gmail (dot) com

Thank You!

Tuesday, December 6, 2016

How To: Upcycled House Ornaments and a Holiday Blog Hop!


Hi all!  I'm so excited because it's the FIRST blog hop with members of the Jessica Sporn Designs Creative Team. 

Today I'm hopping along with 


to share some holiday creations using my stamps and stencils. 

I hope you've been enjoying the Creative Team posts - I know I have! 
AND.... 

We have a great three giveaways - one lucky commenter will win my Blessings stamp from Rubbermoon


another will win this little holiday ornament, 


and another will win this lovely wall hanging by Creative Team member Denise Alloca.  Denise couldn't participate in the hop, but created this beautiful project for her tutorial & post on December 22.  

My little ornaments were inspired by some cardboard I received in a food delivery package, as well as Kristin's brilliant "Tiny Homes" tutorial.  She inspired me to pull out my glitter and use these stamps in a very different way than I had previously envisioned! 

I filmed my process -- hope you enjoy the video.


Now hop on over to Karen GauntSherry CaninoDenise Alloca and Kristin Van Valkenburgh
to see what they've created!

All comments on all the posts count - so don't forget to leave your kind words!  

If you are entering the GIVEAWAY, please add your email address in the event I need to contact you.

To avoid SPAM, please write it like this: jessicasporndesigns (at) gmail (dot) com

Thank You!


         Visit Stencil Girl Products and RubberMoon Stamps to see all my designs!


If you haven't already - please connect with me here:
Your comments make me so happy and let me know you were here. I read and treasure every comment and will happily answer any questions as soon as I can.