Showing posts with label Valentine's Day. Show all posts

Tuesday, February 14, 2017

How to Create a Juicy Background

Before I get to today's topic, the winner of the Valentine's Day blog hop is Monica Garcia!

Thank you to all who participated in our hop. We loved sharing our art with you!

And now, to my tutorial.  As you probably are aware, I love painting angels.  These days, more than ever, I feel compelled to call upon them and manifest them in my life.  It's been a rough few weeks; we need angels more than ever.


Here's a look at how I created a juicy, inviting background for some angels.  The techniques are applicable to any art journal page or mixed media project.


You can also watch "Creating a Background for Angels" on YouTube here.

My daughters and I attended the Women's March on Washington in late January.


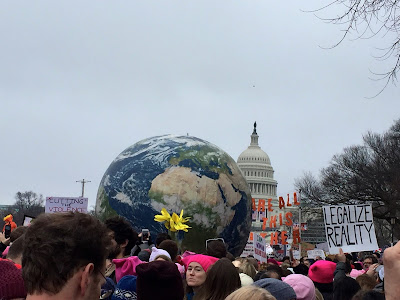
Were you there or did you participate in any of the marches in your state or around the world? It was amazing to see the outpouring of people, and the love and support for compassion, tolerance and empathy.

Here's my older daughter's account of our experience, I Was There, which was wonderful, inspiring and heartbreaking all at the same time.  


Sometimes I am exhausted trying to resist the daily executive orders and pronouncements coming from Washington.  But then, I remember that I have my sisters with me.  That, and taking refuge in my artwork, sustains me.


Thanks for visiting.


         Visit Stencil Girl Products and RubberMoon Stamps to see all my designs!


If you haven't already - please connect with me here:
Your comments make me so happy and let me know you were here. I read and treasure every comment and will happily answer any questions as soon as I can.

Thursday, January 26, 2017

DIY Valentine's Pillow - Creative Team Thursday with Kristin Van Valkenburgh

“The best thing to hold onto in life is each other.”
— Audrey Hepburn 

Helllooooo & Happy Creative Team Thursday!

I was so excited when I saw Jessica’s latest stencil - “Seven Hearts” by Stencil Girl - that I just had to play with it in time for Valentine’s Day. The only challenge was what and where I was going to use it. Since I had a few canvas pillow covers lying around (and a pension for all things pretty and pink), a DIY Valentines pillow seemed to be the perfect solution . . . .

I began with a nice coat of gesso that was both scraped on with a palette knife and then smoothed out with a brayer. Once dry, I followed up with several coats of acrylic paints and paint splatters before starting in with my sweet new stencil.

Speaking of sweet, I’m learning that I just plain prefer to use an ink pad with my stencils. Don’t get me wrong, I love playing with molding pastes, spray inks, gessoes and other mediums, but when I want a crisp, sharp image, permanent ink just does the job better than anything else. In this case, I love how clear the pretty little hearts, scalloped edges and lettering come out when a thick coat of ink is pressed onto the canvas with a simple cosmetic sponge.

Once all the stenciling was complete, I simply glued and sewed (well ok, only a tiny bit of sewing took place) on fabric and trim scraps to the bottom and sides of the pillow for a quirky final touch.

Love the stencil as much as I do? Be sure to join the Jessica Sporn Design Team for our next Blog Hop on Tuesday, February 7th for more Valentine inspired artwork and your chance to win your very own “Seven Hearts” Stencil.


In the meantime, you can watch my video on YouTube to see how I created this Valentine's Pillow step-by-step. Click here to watch on YouTube:  https://youtu.be/ttHOY9Yp4BA 


Until then,
Kristin xo


A childhood obsession with Hollywood starlets led to an early life in the theater, where Kristin Van Valkenburgh spent many happy days on set and behind the scenes as both an actress and makeup artist for the stage. Kristin has a passion for all things mixed media and loves to create whimsical pieces with lots of layers, bright, poppy colors, big eyes and positive affirmations. Her work has been featured in numerous Stampington publications including Somerset Studio, SomersetStudio Gallery, Somerset Life, Somerset Apprentice, Artists’ Cafe and Art Journaling.  

You can find Kristin on her blogYouTube, Facebook and Instagram.

THANK YOU KRISTIN!  To see all of the Creative Team posts, click here!


         Visit Stencil Girl Products and RubberMoon Stamps to see all my designs!


If you haven't already - please connect with me here:
Your comments make me so happy and let me know you were here. I read and treasure every comment and will happily answer any questions as soon as I can.

If you are entering a GIVEAWAY, please add your email address in the event I need to contact you.

To avoid SPAM, please write it like this: jessicasporndesigns (at) gmail (dot) com

Thank You!

Saturday, February 6, 2016

Easy Distress Ink Stenciled and Stamped Valentine Tags

Last year, I took a wonderful online class given by Marjie Kemper called "Inventive Inks."  I had accumulated lots of beautiful tags as I practiced her inking techniques.  


If you have some pretty backgrounds laying around, here's a quick project to make unusual Valentines.  (Somehow, my Valentines are always quirky, as you can see here.)  

First, over-stencil your backgrounds using a deeper version of the color you have underneath.  I did this with more distress inks, or you can use paint.  (I used my Hearts, Flowers and More stencil but you can use something in your stash.) 


Then, create some embellishments by stenciling or stamping using black ink or paint on music, book or ledger paper.  (I used motifs from my Coffee, Mugs and Love, and Teacups and Teapots stencils on old music paper.) If your paper is fragile, as mine was, first give it a coat of clear gesso or matte medium to strengthen it.


These motifs are from the Build a Villa collection at Rubbermoon.  I painted them with Peerless watercolors.  

Then, let your muse take over as you cut out your motifs, assemble, embellish, doodle and add words.  

You should end up with a stack of funky, quirky Valentines!


Have you made Valentines this year?  I'd love to see them so please leave a link in your comment! 


Your comments make me so happy and let me know you were here. I read and treasure every comment and will happily answer any questions as soon as I can.

If you haven't already - please connect with me here:

If you are entering a GIVEAWAY, please add your email address in the event I need to contact you.

To avoid SPAM, please write it like this: jessicasporndesigns (at) gmail (dot) com

Thank You!

Thursday, February 13, 2014

Quick Valentine's Day Canvas With Lots of Texture


I made a quick Valentine for my honey and wanted to show you how.

I used embossing paste, powder and stencils to give it lots of texture.  These techniques could be used for any project.

I started with a 6 x 6 chipboard square that I had collaged months ago.  I cut out a heart from a manila file folder, and used it as a mask and spread modeling paste away from it to the edges.


I played with Derwent Inktense Blocks, Neocolor II crayons, Viva Decor Modeling and Special Effects Pastes, and UTEE powder.  I used some random butterflies from my stash too.


I forgot to stop and take pictures, but here's a quick video as luckily I had the camera running!


Stay tuned for tomorrow's post - it's the new word for One Little Word, and I have a giveaway too!

Happy Valentine's Day!

 Your comments make my heart flutter!

 Follow on Bloglovin