Thursday, July 27, 2017

Mixed Media Process with Kristin Van Valkenburgh


“Coming together is a beginning; keeping together is progress; working together is success.”
— Henry Ford

Happy Thursday! I hope this finds you well!  I can hardly believe it, but today marks my last post for this year’s Jessica Sporn Designs Creative Team. I made 15 videos over the course of the year, happily playing with Jessica’s beautiful collection of stencils from Stencil Girl and stamps from RubberMoon. Her work is unique, elegant, thought-provoking and above all else, filled with love. It was an honor to represent her and her products, this year and always.


I also want to thank DecoArt Media for supplying us with gorgeous, color drenched supplies and beautiful grounds to work with. I’d been a fan before, but now, after using their buttery gesso and thick, rich ink sprays, I can easily say I’m a lifer. . . .

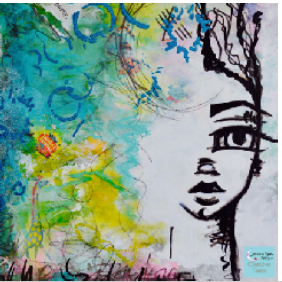
Now, on to this week’s process video entitled, “Come to My Party.” I used the backing of a 9 x 12 pad of paper for this one, as well as a combination of stamping, stenciling, collaging, drawing and fingerprinting for a truly mixed media piece.


I hope you have fun watching, and please do let me know if you try anything similar, I’d LOVE to see what you come up with.  

If you’d like to keep up with my arty adventures, check out my personal YouTube channel over HERE: https://www.youtube.com/channel/UC10sBwGToZKc3nnfT69PzFg.


Stamps used:
Bubbles Girl Stencil by Stencil Girl: http://www.stencilgirlproducts.com/product-p/l180.htm
Build-A-Villa Stamps by RubberMoon: https://rubbermoon.com/collections/jessica-sporn/products/build-a-villa-whimsy-turret-js5365g-rubber-art-stamp

With Love, Light & Inky Fingers,
Kristin xo


A childhood obsession with Hollywood starlets led to an early life in the theater, where Kristin Van Valkenburgh spent many happy days on set and behind the scenes as both an actress and makeup artist for the stage. Kristin has a passion for all things mixed media and loves to create whimsical pieces with lots of layers, bright, poppy colors, big eyes and positive affirmations. Her work has been featured in numerous Stampington publications including Somerset Studio, Somerset Studio Gallery, Somerset Life, Somerset Apprentice, Artists’ Cafe and Art Journaling.  


You can find Kristin on her blogYouTube, Facebook and Instagram.

THANK YOU KRISTIN!
To see all of the Creative Team posts, click here!


         Visit Stencil Girl Products and RubberMoon Stamps to see all my designs!


If you haven't already - please connect with me here:
Your comments make me so happy and let me know you were here. I read and treasure every comment and will happily answer any questions as soon as I can.

If you are entering a GIVEAWAY, please add your email address in the event I need to contact you.

To avoid SPAM, please write it like this: jessicasporndesigns (at) gmail (dot) com

Thank You!

Tuesday, July 25, 2017

Create Vibrant Artwork with Gelli Plate


I love going through some of my older posts; they always inspire me... This post was originally posted on August 5 of 2015.  I hope you'll enjoy a look back at these beautiful, vibrant paintings!


I've been teaching an amazing group of women this summer.  One of them, Lesley, took one of my classes at The Ink Pad.  She contacted me in May, asking if I would come to Long Branch once a week and teach a group in her home.  I'm so glad I said yes!  It's been a great adventure, and I learned so much as I planned a new lesson for each of the six weeks.

Our last lesson was on Tuesday, and it seemed fitting to have a Gelli Plate Party!  None of these women had ever used the gelli plate before, and their excitement and joy was thrilling.  The paint and prints were flying!  All my Stencil Girl stencils were in the mix, plus a big favorite -- Terri Stegmiller's recent design for Stencil Club.


Peacock stamp from Rubbermoon!
 We used our gelli prints to make illustrations inspired by African Masks, following the steps I used in this post to create a Ganesh Superhero.


Here is the preliminary work:


and three of the finished pieces.  Aren't they awesome!!!


Here's a picture of all the women at the conclusion of one of our earlier classes.  I have truly enjoyed working with them.


Here's my finished demo piece - inspired by Cecil the Lion and this editorial


 Maria McGuire's Greek Border stencil provided the perfect finishing touches.


How do you use your gel prints?

Your comments make me so happy and let me know you were here. I read and treasure every comment and will happily answer any questions as soon as I can.

         Visit Stencil Girl Products and RubberMoon Stamps to see all my designs!


If you haven't already - please connect with me here:
Your comments make me so happy and let me know you were here. I read and treasure every comment and will happily answer any questions as soon as I can.

If you are entering a GIVEAWAY, please add your email address in the event I need to contact you.

To avoid SPAM, please write it like this: jessicasporndesigns (at) gmail (dot) com

Thank You!

Thursday, July 20, 2017

Mixed Media Paper Quilt by Lizzy Wurmann - Creative Team Thursday

Hi all, it's Lizzy with you today with a fun project to try.

I wanted to create a quilt with my own patterned paper, so I stenciled over previously painted papers and cut 1.5 and 2 inch squares to start making the design. 

To make it easier for me, I traced a diagonal on the cardstock and then I glued one square on each side of that line and from there, I started gluing one on each side of those until I completed the page. 


My plan was to make a card with the small panel and leave the big one for other projects cutting it into stripes, circles or squares or leave it as it is to use it as a base for a journal page or a collage.

Follow along with my video YouTube to see how I created this paper quilt step-by-step.


Stencils used:

Until next time!
Lizzy

We'd love to see what you create with this technique!  Be sure to share it with us on Pinterest and tag us using #JessicaSpornDesigns #CreativeTeam

Thank you so much for watching!  To check out more awesome creative team posts and videos, please click here, or subscribe via YouTube.   


Lizzy Wurmann is a mixed media and scrapbook artist living in Santiago, Chile.  She uses a colorful and vibrant palette to create whimsical, unique, and often altered art.   Her quirky and abstract style has been featured in Somerset Studios, Somerset Memories and Somerset Digital Studios.  Lizzy is a veteran of many design teams, including Scraps of Darkness, Doris Castle, and Lindy’s Stamp Gang.  Find Lizzy on her blog, FacebookInstagram and very active YouTube Channel.


_______________________________________________________________________________

THANK YOU LIZZY for an awesome post! I love your inspired tutorial!


         Visit Stencil Girl Products and RubberMoon Stamps to see all my designs!


If you haven't already - please connect with me here:
Your comments make me so happy and let me know you were here. I read and treasure every comment and will happily answer any questions as soon as I can.

If you are entering a GIVEAWAY, please add your email address in the event I need to contact you.

To avoid SPAM, please write it like this: jessicasporndesigns (at) gmail (dot) com

Thank You!

Tuesday, July 11, 2017

How To Beautify a ChipBoard Notebook Cover and Giveaway and Winner Announced


Two years ago, when I signed up for the Documented Life Project, I received two Chipboard notebooks.  I never used them in connection with all the wonderful tutorials, and they've been sitting on my shelf of "things to repurpose!"

Recently, on Stencil Girl Talk, I came across two wonderful tutorials by Gwen LeFleur and Debi Adams.  I incorporated bits of both of them to jazz up this book.


You can also watch Fallen Leaves Chipboard Cover on YouTube here.    In addition to my new Fallen Leaves stencil, I used the Women Heal the WorldDots and Dashes and the 9 x 12 Stencil from the January 2014 Stencil Club Kit.  I found that heavy body acrylic paints worked best for this project, and was also happy to have an excuse to use some of my acrylic markers.


I hope this video gives you some ideas, and that it inspires you the way the StencilTalk tutorials inspired me!  

GIVEAWAY ALERT:  I will send one of the Fallen Leaves stencils to one commenter!  Leave a comment below with your email address to be eligible to win.  I'll announce the winner on my blog next Tuesday!


To avoid SPAM, please write your email address like this: jessicasporndesigns (at) gmail (dot) com


         Visit Stencil Girl Products and RubberMoon Stamps to see all my designs!


If you haven't already - please connect with me here:
Your comments make me so happy and let me know you were here. I read and treasure every comment and will happily answer any questions as soon as I can.

Thank You!