Showing posts with label tutorial. Show all posts

Thursday, June 22, 2017

Paint Your Own Born to Be Wild Canvas - Denise Alloca Creative Team Thursday


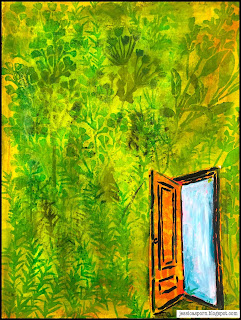
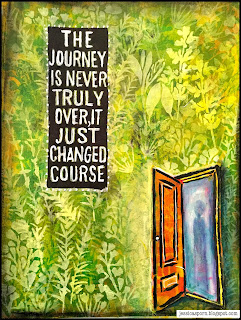
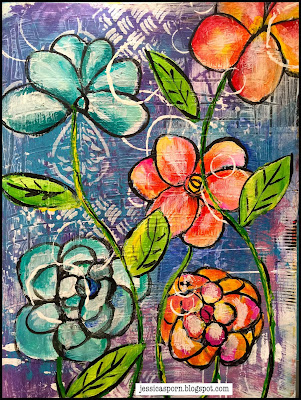
When I received Jessica’s Born to Be Wild Animals stencil it reminded me of my daughter, not that she’s a wild child!  That and she loves animals and has an incredible spirit.  For this Design Team contribution I decided to make a canvas for my daughter Erin.  Using three of Jessica Sporn’s stencils I created a bright, positive piece of artwork for Erin. I started off painting my canvas in bright colors, then I used a texture plate to add interest.  


Next I used a reductive stenciling technique that gives a subtle and interesting look to the image.  A little detailing with Stabillo pencils and water, and done.


I hope you enjoy the video!


Materials:
10x10 Canvas
Acrylic paints
Jessica Sporn’s Stencils found at:
 http://www.stencilgirlproducts.com/stencils-jessica-sporn-s/1827.htm
Stabillo Pencils
Faber Castel Black Gelato
Deco Arts Americana Sealer


With a passion for art from an early age, Denise Alloca turned her interest to photography and later art education. Through her diverse exposure to various art forms, she found her way to mixed media art, where she currently showcases her work on her blog.  Denise has been a Design Team member for Donna Downey’s Artist Gang, creating instructional videos showcasing various mixed media techniques.  Denise's work has also been published in Art Journal Kickstarter, which offers advice and techniques for art journaling enthusiasts.


Thanks for this great tutorial Denise!  

Make sure to check out all of the Creative Team's wonderful creations and inspiration.


         Visit Stencil Girl Products and RubberMoon Stamps to see all my designs!


If you haven't already - please connect with me here:
Your comments make me so happy and let me know you were here. I read and treasure every comment and will happily answer any questions as soon as I can.

If you are entering a GIVEAWAY, please add your email address in the event I need to contact you.

To avoid SPAM, please write it like this: jessicasporndesigns (at) gmail (dot) com

Thank You!

Thursday, June 8, 2017

Mermaid Madness!

I am thrilled to be part of Stencil Girl Products celebration of "Mermaid Madness!"  


Did you ever play mermaid when you were a kid?  I did.  My hair was really long, and I used to try to swim with my legs together like a long tail, while swishing my hair around in the water.  I'm not sure why mermaids have such an allure, but they do!

Here is a box I made with the stencil I designed, called Mermaids and Masks, to memorialize that playful time in my life. 


And a handmade journal I created using the mermaids and elements from the stencil to pull the different pages together.


I filmed part of my process for this journal.  I hope it gives you some inspiration!


You can also watch Making a Mermaid Journal on YouTube here.     You'll see that I also used the "Women Will Heal the World" stencil in this video.  You still have a few days to be eligible to win that stencil by commenting on the June Blog Hop post, here.

I can't wait to see what the other artists, who also designed Mermaid themed stencils, have created! It's all on the Stencil Girl Blog!

Just keep swimming!


         Visit Stencil Girl Products and RubberMoon Stamps to see all my designs!


If you haven't already - please connect with me here:
Your comments make me so happy and let me know you were here. I read and treasure every comment and will happily answer any questions as soon as I can.

If you are entering a GIVEAWAY, please add your email address in the event I need to contact you.

To avoid SPAM, please write it like this: jessicasporndesigns (at) gmail (dot) com

Thank You!

Tuesday, April 25, 2017

DIY - Painting on Porcelain


I've experimented with decorating white porcelain plates with sharpies before.


But my experiments were always in black and white.  I decided to do another experiment with color.

Here's a super short time-lapse video of how it all started ...


Steps:  Make sure to wash your plates first, to make sure there is no residue.   I find it's easier to cut up my stencils (GASP!) to make it easier to lay the motifs on the plates.   (Note that the 4 x 4" stencils from Stencil Club are perfect - no cutting needed!  The orange/yellow middle swirl flower was designed by Maria McGuire for March 2017.    All of the other elements are from my designs for November 2016.  (If you don't know about Stencil Girl's Stencil Club - check it out here.))


I sketched in the motifs (plus some doodles), using regular Sharpie markers.  (The recommendation you'll find on the internet is to use oil paint markers.  But I used regular Sharpies and the result was good.  It was good to have both the fine and extra fine tips depending on the size of the opening of the stencil.)

Once I had all the designs drawn in, I baked them in a 350 degree oven for 30 minutes.  (you can find varying instructions on Pinterest.  Some say 150 degrees, others 450.  I went in the middle, which turned out to be fine.)  I've washed these with soap and water and a scrubby sponge - and they're holding up just fine.  (I haven't put them in the dishwasher.)


Quick and easy, one-of-a-kind gifts for summer entertaining!

Your comments make me so happy and let me know you were here. I read and treasure every comment and will happily answer any questions as soon as I can.

Thank You!


         Visit Stencil Girl Products and RubberMoon Stamps to see all my designs!


If you haven't already - please connect with me here:

Tuesday, March 14, 2017

Five Ways to Rescue an Art Journal Page

If you're like me, you sometimes abandon an art journal page or project because you think it can't be saved.  Recently, I had just such a page, and searched "ways to rescue an art journal page."  Funny enough, the search led me to MY OWN POST from about a year ago!


Since I didn't even remember I had created it, I thought it would be useful to repost it!  Enjoy.

We all have pages in our journals that we hate.  Either the page didn't turn out as we planned, or we had an "accident" on it - something spilled or a product was expired and didn't react as it was supposed to.  Here are five ways you can take such a page and turn it around. 

1.  Make your background your foreground.  Use gel medium through a stencil, let it dry, and then gesso over the rest of the page.  Wipe the gesso from the gel'd areas with a baby wipe, leaving your background peeking through.  You can add journaling over the gesso, or just keep going with another technique.   

You can watch a video of this process here by Peerless Designs.

Stencil used: Eastern Lotus and Leaf Repeat
 2.  Add lots of layers using the same stencil or stamp.  Using the same stamp or stencil, first do a layer of really dark color.  Then use a lighter or neutral color.  Finally, use a very light color, like a Titan Buff or white.  You will get lots of depth using one tool.  Then add a sentiment or embellishment, and voila!

Stencil used:  Herbs and Doors & Windows

3.  Tease out hidden elements.  Hold your page far away from you and squint.  Are any hidden shapes peeking through?  Bring them out.   Here, I saw a face peeking through the leaves and brought her to the front.  (For more on this technique, as well as my tips and tricks for painting faces, check out my online class - Facing Faces!)

Stencil Used:  Curvy Stems by Terri Stegmiller
4.  Push your page to the background by adding elements in complimentary colors.  See how the orange flowers seem to jump forward?  You can do this with paint, ink or collage.  (This page is a demo from one of my Floral Canvas Class.)


5.   Just keep going.  Keep adding layers.  Remind yourself that no effort you make in your artwork is ever wasted.  Something you initially dislike may hold the kernels of something you may eventually love.   That's what happened for me with this 2013 journal page.  


Here's a video of how it happened. 


You can also watch Rescuing a Journal Page on YouTube.
Here's what my worktable looked like as I experimented with all these techniques!


I leave you with these words from one of my favorite books - The Phantom Tollbooth, by Norton Juster:
“You may not see it now," said the Princess of Pure Reason, looking knowingly at Milo's puzzled face, "but whatever we learn has a purpose and whatever we do affects everything and everyone else, if even in the tiniest way. Why, when a housefly flaps his wings, a breeze goes round the world; when a speck of dust falls to the ground, the entire planet weighs a little more; and when you stamp your foot, the earth moves slightly off its course. Whenever you laugh, gladness spreads like the ripples in the pond; and whenever you're sad, no one anywhere can be really happy. And it's much the same thing with knowledge, for whenever you learn something new, the whole world becomes that much richer.”
Words to live by! 

         Visit Stencil Girl Products and RubberMoon Stamps to see all my designs!


If you haven't already - please connect with me here:
Your comments make me so happy and let me know you were here. I read and treasure every comment and will happily answer any questions as soon as I can.

If you are entering a GIVEAWAY, please add your email address in the event I need to contact you.

To avoid SPAM, please write it like this: jessicasporndesigns (at) gmail (dot) com

Thank You!