Showing posts with label sharpie. Show all posts

Thursday, June 15, 2017

DIY Tote Bag using Stencils with Marit Barentsen - Creative Team Thursday


Summer is in full swing in The Netherlands and since I live near the North Sea, I thought it would be nice to make a tote bag to take my things (towel, drinks, book) with me to the beach.***

I had some left over pieces of fabric laying around so I sewed my own tote bag but if you are not a seamstress you can easily find/buy a plain, off-white tote to decorate and make your own.
This won't be a 'how to sew a bag' tutorial but if you are handy with a sewing machine and like to sew a tote bag yourself, here's the sizes of my tote.


I cut two pieces of canvas for the front and bag and strips of left over white fabric (I don't know exactly what kind of textile it is, it looks like curtain fabric and has a bit of texture in it.)


I put the strips aside and start to decorate the back and front of my tote. If you work on an existing tote back, be sure to put a piece of plastic in the tote before decorating it to prevent the other side from bleeding spots. I want the decoration to be fun and whimsical so I use 5 different stencils.


I have one bottle of pink fabric spray paint that I use to spray over the Dots & Dashes stencil. I then take my acrylic paints and use brushes, a brayer and my hands to smear, stencil, plug, rub and paint.
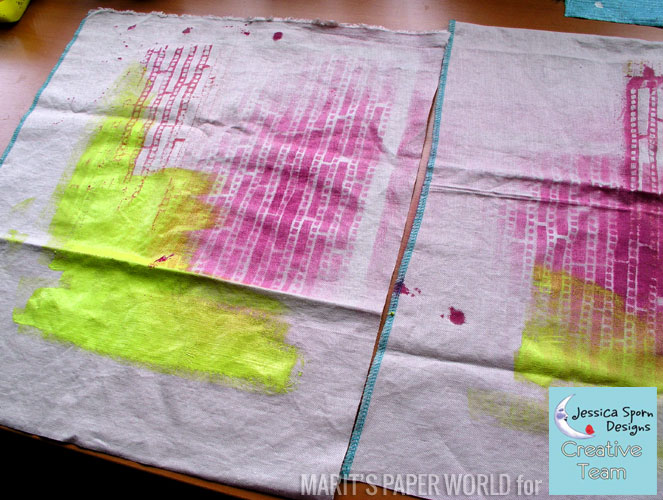

I choose bright colors and keep on adding paint...


Once the background is to my liking, it's time to get out the stencils that have more of a figurative design: Judy's Trees, Fallen Leaves and Love is for Everyone Script. I also stamp some circles with a toilet roll, just because I love circles.
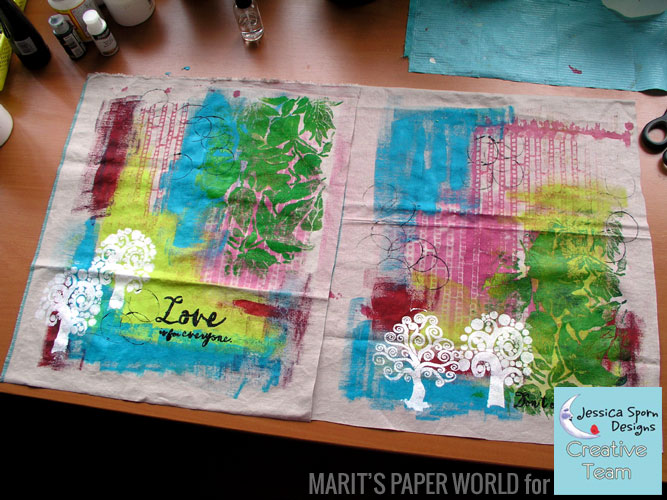


I find the look still a bit boring, so I take out my favorite stencil Circles & Squares and add some extra white. I outline the images with a black Poster-paint Sharpie for more contrast 'et voila!'


Here's a detail photo.


On to the strip then... I cut a few strips earlier and I now sew those together to get one, really long strip that will fit around the bag. To match the design on the front and back I decide to use the Dots & Dashes stencil again with black paint.


My plan was, to make an astringent black and white print and add a lot of black but once I start to apply the paint through the stencil (I use a brayer for that) I notice that the texture in the fabric adds for extra interest - those are the happy accidents that make creating fun - so I go easy with the black paint.


Once the fabric is dry, I sew the parts together. I have a bit of 'strip' fabric left over that I sew at the top of the tote. I also use some of the black & white fabric to create the handles.

And now that we come to the end of the tutorial, you want to see the finished tote bag don't you? And maybe you also wondered what the *** (asterisks) meant at the beginning of this post... well, when my tote was done I showed it to my beloved and he just LOVES it!!! In our household he is the one that walks to the store to do the grocery shopping for our dinner almost daily and this tote would be perfect for that. So my beach tote gets another use... as of now you can see my beloved walking around with this tote.


SUPPLIES USED:

Stencils:
• Dots & Dashes
• Judy's Trees
• Circles & Squares
• Fallen Leaves (new)
• Love is for Everyone Script (new)

Other:
• Pink textile spray ink
• Acrylic paints
• Black poster-paint Sharpie


Marit Barentsen is a passionate art journaler, mixed media artist, art instructor and creative writer from the Netherlands. Marit inherited a passion for words from her mother, who is a writer. Her father taught her to not only “look “ but also “see.”  That combination led Marit to become an art teacher and her art always showed images and words. After art school, she worked as a graphic designer. Years later, she re-discovered the  combination of words and images in art journaling and her art took flight.  Marit's art has been published in various magazines and art books. 


Find Marit on her website, Facebook page, and  blog.

_______________________________________________________________________________

THANK YOU MARIT for an awesome post! 


         Visit Stencil Girl Products and RubberMoon Stamps to see all my designs!


If you haven't already - please connect with me here:
Your comments make me so happy and let me know you were here. I read and treasure every comment and will happily answer any questions as soon as I can.

If you are entering a GIVEAWAY, please add your email address in the event I need to contact you.

To avoid SPAM, please write it like this: jessicasporndesigns (at) gmail (dot) com

Thank You!

Tuesday, April 25, 2017

DIY - Painting on Porcelain


I've experimented with decorating white porcelain plates with sharpies before.


But my experiments were always in black and white.  I decided to do another experiment with color.

Here's a super short time-lapse video of how it all started ...


Steps:  Make sure to wash your plates first, to make sure there is no residue.   I find it's easier to cut up my stencils (GASP!) to make it easier to lay the motifs on the plates.   (Note that the 4 x 4" stencils from Stencil Club are perfect - no cutting needed!  The orange/yellow middle swirl flower was designed by Maria McGuire for March 2017.    All of the other elements are from my designs for November 2016.  (If you don't know about Stencil Girl's Stencil Club - check it out here.))


I sketched in the motifs (plus some doodles), using regular Sharpie markers.  (The recommendation you'll find on the internet is to use oil paint markers.  But I used regular Sharpies and the result was good.  It was good to have both the fine and extra fine tips depending on the size of the opening of the stencil.)

Once I had all the designs drawn in, I baked them in a 350 degree oven for 30 minutes.  (you can find varying instructions on Pinterest.  Some say 150 degrees, others 450.  I went in the middle, which turned out to be fine.)  I've washed these with soap and water and a scrubby sponge - and they're holding up just fine.  (I haven't put them in the dishwasher.)


Quick and easy, one-of-a-kind gifts for summer entertaining!

Your comments make me so happy and let me know you were here. I read and treasure every comment and will happily answer any questions as soon as I can.

Thank You!


         Visit Stencil Girl Products and RubberMoon Stamps to see all my designs!


If you haven't already - please connect with me here:

Thursday, February 2, 2017

How to: Upcycle Cardboard into Inspirational Art - Creative Thursday with Sherry Canino

Hi Creative friends! Sherry Canino here today for the Creative Team and I have a fun tutorial on how I used some amazing stencils from Jessica Sporn Designs and some cardboard from my recycle bin to create some mixed media houses.

This is a fantastic way to use up lots of bits and pieces in your stash or things you may have laying around so grab your coffee and enjoy the video!


Here is a close up of the house completed in the video
And here are some other houses I completed using the same stencils as well as one additional stencil not used in the video.  (You'll see the complete list of stencils used below.

So now what to do with all these adorable houses you have created???  Well I decided to turn mine into a piece of home décor which is why all of my houses have a positive or inspirational saying on them that I cut out from magazines.

The steps to create a simple home décor piece out of your mixed media houses are super simple:
  • Take a canvas and turn it over so you are using the back side, cover it in book pages, old sheet music, scrapbook or patterned paper or whatever you like the look of, I used dictionary paper.  
  • Use a decoupage process to adhere your papers on and be sure to cover up all the wood on the back side of the canvas as well as wrap it around the edges.  
  • Once dry I added just a tiny bit of color using a dry brush and paints in similar colors used on my houses to keep the look cohesive.  
  • Then take your houses and arrange them on your canvas to your liking and glue on with a gel medium or E6000 glue.  (you want a glue that is going to be strong once it's dry so they don’t pop off. ) 
And that’s it, let it dry and display.  Below is a photo of my completed canvas.  I chose to write a little saying at the top using a black sharpie and then added some hearts and swirls from the Coffee Mugs and Love Stencil.

Here is a list of, and links to, the stencils I used in the video:


I hope you'll make your own houses and share them with us!

Sherry Canino, a former accountant, is a self taught mixed media artist and owner of Canino’s Artistic Café. She also works as an art therapist for a local organization.  Her style is whimsical, colorful and inspirational and has been featured in Syracuse Women’s Magazine.  She offers local as well as private art classes in her Liverpool Studio, and art journal or art therapy classes on location for businesses and schools.  Find Sherry on Facebook , Instagram, Etsy and on her blog.

THANK YOU SHERRY!  To see all of the Creative Team posts, click here! 


         Visit Stencil Girl Products and RubberMoon Stamps to see all my designs!


If you haven't already - please connect with me here:
Your comments make me so happy and let me know you were here. I read and treasure every comment and will happily answer any questions as soon as I can.

Tuesday, March 29, 2016

Easy DIY Serving Plates with Stencils &Giveaway


There are tons of Pinterest Boards  devoted to decorating white porcelain plates with Sharpie markers.  I decided to get in on the action!

Here are the steps I took to decorate four small plates using my newest "Herbs" stencil from Stencil Girl.

I bought the 4 canapé size plates on Amazon.  (You can probably find white porcelain plates at the Dollar store, but I like shopping from my studio!)

I washed the plates first, to make sure there was no residue.   After I figured out the placement of the herbs, I actually cut up my stencil (GASP!) to make it easier to lay the stencil motifs on the plates.  

I sketched in the motifs, using Sharpie Oil Paint markers.  It was good to have both the fine and extra fine tips depending on the size of the opening of the stencil.


Once I had them all drawn in, I baked them in a 350 degree oven for 30 minutes.  (you can find varying instructions on Pinterest.  Some say 150 degrees, others 450.  I went in the middle, which turned out to be fine.)  I've washed these with soap and water and a scrubby sponge - and they're holding up just fine.  (I haven't put them in the dishwasher.)


These are basically the same steps that Vanessa Spencer used to create these gorgeous plates using the Three Owls and a Branch stencil.  

The Herbs stencil is inspired by Scarborough Fair, one of my favorite songs.

  
So what do you think?  Are you inspired to create your own unique dishes?   
Click here to see demo posts of all my new stencil releases! 

Comment to win one of the "Herbs" stencils.  Next Tuesday, I'll go back and update this post with the winner, so remember to check back!   

And the winner is Amy! Congratulations!!

If you haven't already - please connect with me here:
Your comments make me so happy and let me know you were here. I read and treasure every comment and will happily answer any questions as soon as I can.

If you are entering a GIVEAWAY, please add your email address in the event I need to contact you.

To avoid SPAM, please write it like this: jessicasporndesigns (at) gmail (dot) com

Thank You!