Showing posts with label quote. Show all posts

Tuesday, June 20, 2017

How to: Love is for Everyone and Giveaway Winner!


Stencil Girl recently released seven new designs of mine! In recent posts, I've been showing you how I used them. 

Today, I'm sharing a tutorial with the Love is for Everyone Script.

I designed this, and the See the Divine, stencil so that you could mix and match the words to make different phrases, besides the obvious, such as:

Love is Divine
Love is meant to lift us up
lift up out of the darkness
see Love in the darkness
I am in Love 
Love is everything
lift up the Divine in everything
Love everyone and everything
lift everyone up in Love
everything is Divine
I am Divine
I see the Divine

You get the idea! I am sure there are many more!

Of course, you can also use each stencil on its own, like this:


In addition to the Love is Everything stencil, I used my Build a Cosmos stamps from Rubbermoon.  You can see them all here.  


AND only one week late... here is the winner of the summer blog hop!!! It is 

cjsrq, who commented on all of our blogs, and said: Thanks for all you are doing to make America kind (and rational) again.   I am reaching out to you for your snail mail address to send you your Women Heal the World stencil!


         Visit Stencil Girl Products and RubberMoon Stamps to see all my designs!

If you haven't already - please connect with me here:
Your comments make me so happy and let me know you were here. I read and treasure every comment and will happily answer any questions as soon as I can.

Thursday, March 23, 2017

How to Create a Fold-out Card - Creative Team Thursday with Marit Barentsen


In the USA as well as in Europe times are challenging and it sometimes feels as if the world grows darker... therefor I felt the need to create a colorful and happy little booklet. Creating it made me smile and I hope this tutorial will bring a smile to your face too. Enjoy!

Cut a wide sheet of paper into a strip and fold the pages (see photo.) The booklet in this tutorial is 23.25 inch wide, but if you don't have paper that size, you can adjust the sizes or go for less pages)


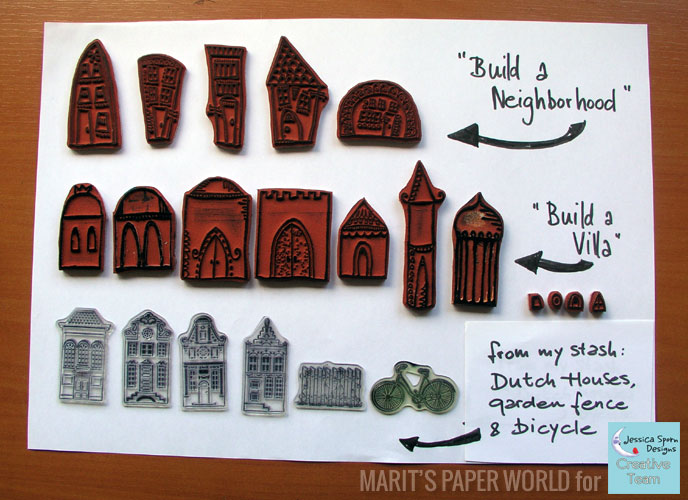
Collect all the houses-stamps that you have to stamp a neighborhood - the more different the images are, the better. You want to build a "multi-cultural neighborhood."


Mix and match; stamp all the houses, domes, fences, street lights, trees and cars in a strip at the bottom of the booklet. Stamp on both sizes of the booklet.


Use masking sheet to trace your 'neighborhood' and cut it out. Cover the stamped images with this mask.


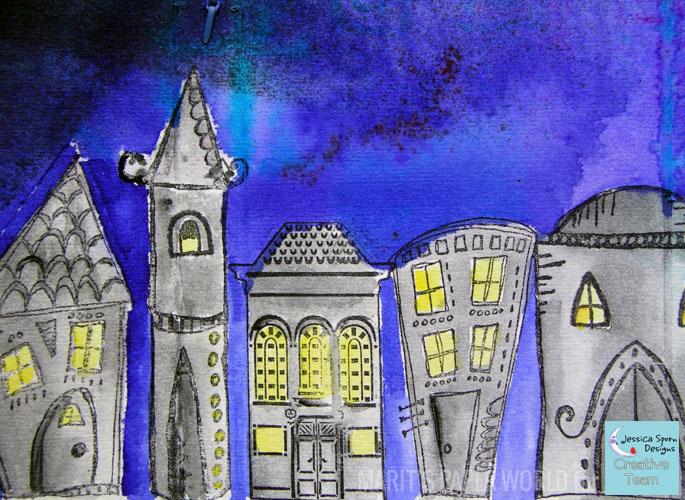
Next step is to create a colorful 'sky'. I wanted the sky to go from dark (nighttime) to light (bright blue - daytime) and used different colors of spray ink to create the effect. Wet your paper first so that the ink will nicely blend into each other. Give the sky some extra interest by spraying through a stencil ('Circles and Squares.')


Spray both sizes of the booklet. Let one side dry before you start working on the other side - if you are impatient you can use a heat gun to speed the process.)


Remove the mask after spraying. There may be white gabs between the houses, that you can fill in with the right color ink and a small brush.

Next, color the stamped images. I used watersoluble crayons and a water brush to create a watercolor effect but you can also color the images with coloured pencils, copic markers etc.

To strengthen the effect of nighttime, I colored the houses that were in the dark "nighttime" area grey. The yellow windows show the lights are on in the houses...


...and I used all kinds of colors to create a fun, bright new neighborhood.


Now, fold the booklet and close it so you can see how the front and back looks like... (You may want to mark the front and back of the booklet before you start writing a quote on the pages. You don't want part of the lettering accidently show on the cover!)

Next, I found two quotes that I hand lettered on the back and front of the booklet. Write the quote with a soft pencil first to see if it fits. On this inside of the booklet the quote covers all pages, from left to right.


On the 'outside' of the booklet, leave the pages that will show when the booklet is closed as they are - no lettering there. The quote I used is from a famous Dutch song and says "Everyone belongs to the world and the world belongs to everyone."


Find a nice, fitting piece of ribbon that will close your booklet. Attach the ribbon to the spine of the book with a cotter pin. As you can see, I also glued a scalloped edge at one side of the booklet (remember those edges from that scrapbooking line?) This edge adds to the whimsical look of the booklet when it's closed.


You can show off this booklet by displaying it on a side table or cabinet if you like.


It also makes a lovely and personal (birthday) present.


I hope you enjoyed my tutorial. Now go enjoy this diverse world we live in. Be nice to each other!

~~~~~~~~~~~~~~~~~~~~~~~~~~~~~~~~~~~~~~~~~~~~~~~~~~~~~~~~~~~~~~~~~~~~~~

SUPPLIES USED:

Stamps from the series 'Build a Neighborhood'
·         Artsy Apartment
·         Humble Highrise
·         Creative Condo
·         Perfect Place
·         Creative Condo

Stamps from the series 'Build a Villa'
·         Crown Top Dome
·         Artsy Arches
·         Doodle Dome
·         Castle Casa
·         Bohemian Hut
·         Whimsy Turret
·         Fonion Dome

Stencils:
·         Circles& Squares

Other:
·         Strip of thick paper
·         Some extra stamps (from my stash)
·         Black stamping ink
·         Masking sheet
·         Dylusions spray ink
·         Water-soluble crayons
·         White and black marker
·         Piece of ribbon

·         Cotter pin


Marit Barentsen is a passionate art journaler, mixed media artist, art instructor and creative writer from the Netherlands. Marit inherited a passion for words from her mother, who is a writer. Her father taught her to not only “look “ but also “see.”  That combination led Marit to become an art teacher and her art always showed images and words. After art school, she worked as a graphic designer. Years later, she re-discovered the  combination of words and images in art journaling and her art took flight.  Marit's art has been published in various magazines and art books. 


Find Marit on her websiteFacebook page, and  blog.

________________________________________________________________________________


THANK YOU MARIT for an awesome post! 


         Visit Stencil Girl Products and RubberMoon Stamps to see all my designs!


If you haven't already - please connect with me here:
Your comments make me so happy and let me know you were here. I read and treasure every comment and will happily answer any questions as soon as I can.

If you are entering a GIVEAWAY, please add your email address in the event I need to contact you.

To avoid SPAM, please write it like this: jessicasporndesigns (at) gmail (dot) com

Thank You!

Tuesday, December 27, 2016

Using Stencils to Spark Your Inspiration

This is an oldie but goodie - from January 2014.  It has some good tips in it - I hope you think so too.

Often, when I don't have a lot of inspiration, I pick a pattern stencil and just start using it on a blank page or a page with leftovers from another project.  I'll pick several different colors of paint that compliment one another (close to each other on the color wheel),  and start pouncing with a cosmetic sponge.   

Here's a tip for how to remember which colors are friendly enough to be mixed when wet.  If you think of the ROY G BIV acronym for the rainbow - ROY (Red Orange Yellow) colors are friendly, and BIV (Blue Indigo and Violet) colors are friendly, G (green) is a little picky - friendly only with the colors on either side -- Yellow and Blue.


For this page, I used Michelle Ward's Marrakech Mix Stencil from Stencil Girl.  I love how there is a "mix" of large and small openings.  Once a layer is dry, I turn the stencil and use another color until there are no white spots on my page.   Then I'll go back in with white paint or gesso, and lighten it up a bit.  Here's how I ended up.


At this point, the page will sometimes suggest something to me.  What it said here was "live simply and gently."  So, I took out black paint and a skinny brush and started sketching.  (I like to sketch with paint because there's just NO WAY to be too precious about it - it's going to be messy, and that's OK!)


On the bottom, I used Pam Carriker's Zig Zag Stamp.  And I sketched in a girl surrounded by animals and a tree.  
More painting.  I'm using matte fluid acrylics, which are very translucent.  I love how the stenciled background shows through, giving lots of depth and texture.


I wanted her skirt to be made in part by feathers.  I have a cool feather stamp that I used on white tissue paper.  I then adhered it to her skirt with matte medium.


I love how the original painting and texture shows through the tissue paper, which melts into the page.  I did the same thing with a french text stamp - used it on tissue paper and adhered it to the page.


I wanted leaves on the trees, so I pulled out my "Judy's Trees" stencil from Stencil Girl, and stenciled some leaves onto tissue paper using green and brown paint.


Then I cut the leaves up and adhered them onto the page. This way, I wasn't stuck to the original arrangement, but could place the leaves the way I wanted for this particular journal page.


I also used the curly branches of one of the other trees on the stencil around the bottom of the page to suggest tree roots and grass.  Can you see them?

My daughter pointed out that the lady's legs were too short - so I lengthened them.  This caused me to add additional texture and pattern to her dress, which I really like.  I added words, and here she is!


And to think she emerged from a mostly blank journal page and Michelle Ward's stencil!

"Live Gently" is available for sale as a print, tote bag, pillow and phone cover on Society 6!


In case you didn't see it previously, I wanted to post a video of how I painted this portrait. 


I often "clean" my work table by gluing whatever is on it into my journal.  That will sometimes "suggest" to me what the page should become.

The page started out as a collage of stenciled tissue paper using my Medallions stencil from Stencil Girl.  Some of that pattern shows through her face.  I finished her off using June Pfaff Daley's starfish stencil, which became a flower in her hair. 

You can see her as a print and more here!


You can also watch Fast Forward Face Painting with Jessica Sporn on You Tube here. 

Have you found any of this helpful?  Let me know in the comments, which make me so happy and let me know you were here. I read and treasure every comment and will happily answer any questions as soon as I can.


         Visit Stencil Girl Products and RubberMoon Stamps to see all my designs!


If you haven't already - please connect with me here:
Your comments make me so happy and let me know you were here. I read and treasure every comment and will happily answer any questions as soon as I can.


If you are entering a GIVEAWAY, please add your email address in the event I need to contact you.

To avoid SPAM, please write it like this: jessicasporndesigns (at) gmail (dot) com

Thank You!